
Click to enlarge photo
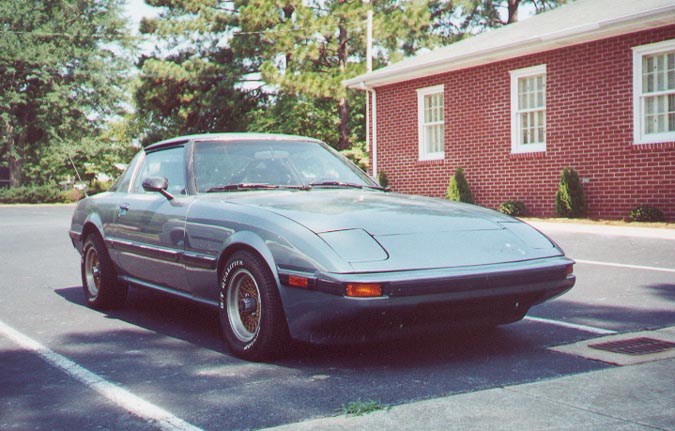
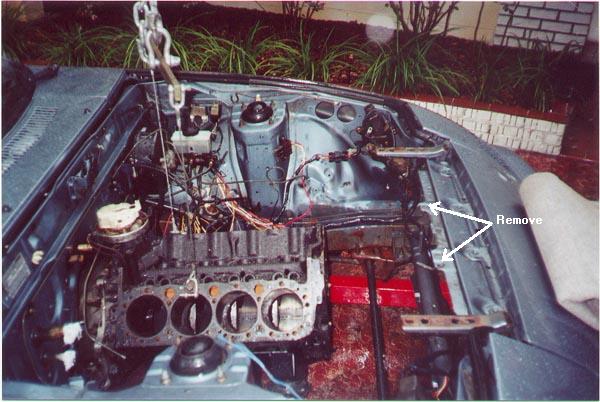
After two blown 12A rotary engines, and an unsuccessful conversion to a 13B, we decided it was time to inject some American muscle into my son’s 85 RX-7. That decision was made easier after finding Granny’s Speed Shop on the Internet. The high quality construction and ease of installation that comes with their conversion kit made the job of installing the motor a breeze. We bolted the transmission and crossmember to an old bare block for a ‘test fit’, and to make the crossmember installation easier.
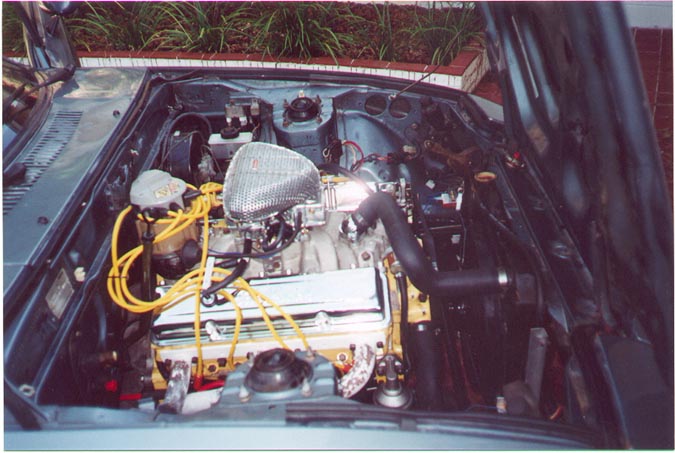
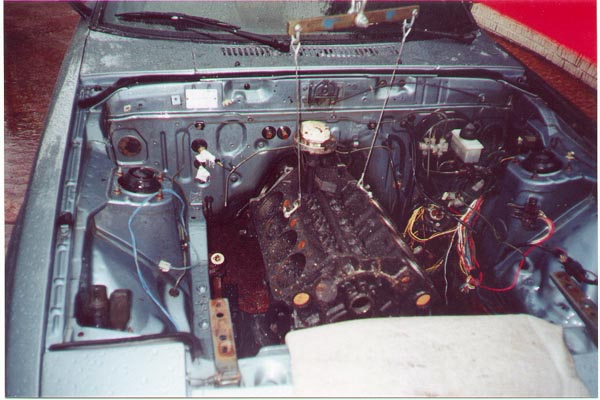
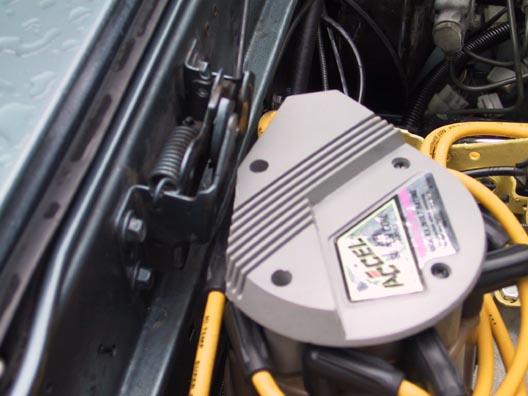
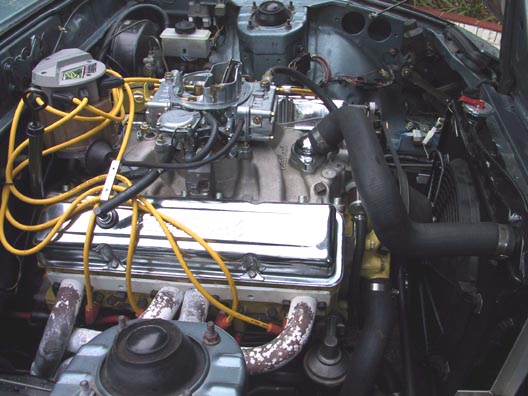
We found a 1977 Chevy 350 that had been partially disassembled and was somewhat incomplete, but the price was right. After we had the block and heads baked (nobody hot-tanks around here), the heads were milled straight, and the rod journals were cut .010 under. We used a ‘re ring’ kit from Northern Auto Parts, which included Cleveite bearings, Hastings rings, and Fel Pro gaskets to reassemble the shortblock with the stock pistons and new ARP rod bolts. We installed a Jeg’s Crane Energizer 274 hydraulic cam kit with H-11 valve springs and Dynagear timing chain set. The stock valves with a fresh grind and teflon seals were used with Crane pushrods and Magnum roller rockers. A Melling high volume oil pump completes the lower end. A 600 cfm vacuum Holley sits on an Edelbrock Performer intake manifold, and spark is provided by a non-computer HEI distributor with Accel cap, HEI Super Coil, and 8mm wires,(a tight fit, but no interference). The motor was kept mild because the car will be used for daily transportation, with an occasional trip down the Orlando Speed World ¼ mile.
The transmission is a TH200-4R, coded CRF, from a Monte Carlo. The front pump and stator shaft were inspected and deemed fit for service, before installing a B&M shift kit. The Mazda rear yoke was installed on a shortened Camaro driveshaft and bolted to the stock positraction RX-7 rearend. I designed a circuit to control the lockup of the torque converter and included the schematic , circuit description and photo here, although a much simpler method , by Chris Boydstun, is to let the 4th gear pressure switch, inside the transmission, control the lockup. In any case, use some method to lock the torque converter to prevent excessive heat in the transmission. We installed a B&M Megashifter, and it fit surprisingly good, and looks pretty good too. We chose that shifter because it looks good, and is offered with an optional short shift lever, although I don’t think we need it, feels pretty good as it is.
So far, we’ve found that it’s not the big things about the conversion that are difficult, it’s the many small details that aren’t obvious in the beginning. Having access to a wrecking yard or junkyard is a big plus, and a nearby hardware store is a necessity. Our first visit was for the throttle cable / transmission cable bracket. We found one on an 80-something Oldsmobile, and took the throttle cable as well. Turns out that the throttle cable fit the RX-7 gas pedal perfectly and even the bushing through the firewall was a perfect fit. The Performer dual plane intake has a boss for mounting the stock bracket, but all manifolds do not, it will not work with our Weiand single plane manifold. In that case, an aftermarket or fabricated bracket would be needed.
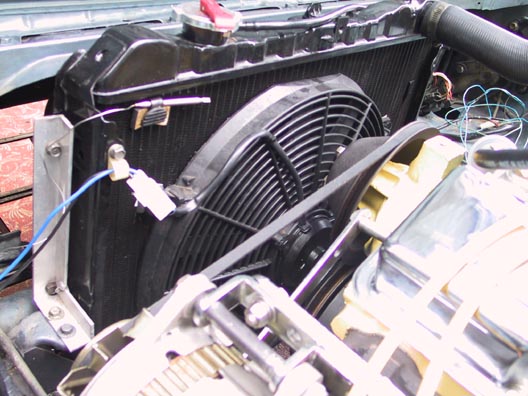
Next, was the water pump and crank pulleys for the required short water pump. They came off of a 1967 Chevy 307. The short water pump is a necessity to mount a radiator with enough clearance for a cooling fan(s). Even at that, we only had 2 ¾ inches of room to place the Perma-Cool 16 inch fan. This fan uses a pancake motor and is only 2 ¼ inches thick. This is also a Florida car, so we will have to see how cool it runs in July and August. The thermostat is a 160 degree unit and the fan sensor turns on the fan at 170 degrees. We mounted the stock RX-7 radiator between the sway bar and the round frame member, using brackets we fabricated from 1 inch aluminum angle stock from the local hardware store. The brackets mount to where the RX-7 oil cooler mounted. There are two ‘protrusions’ that need to be cut or ground off the metalwork that mounted the radiator in it’s stock location. We used an air powered cut-off tool, and it took about two minutes. The radiator will fit snugly against the frame after these are removed. Cut a couple of pieces of nylon tubing or rubber hose lengthwise, and cover the cuts, to prevent wear on the radiator tank. The fan shroud will fit on the radiator in this location, but the centerline of the water pump will only allow a 12 inch fan to clear, and we didn’t feel that would give enough airflow to keep the engine cool in traffic. One very important note, is that the radiator is now located lower in the chassis than the stock location, and is vulnerable to road hazards and curbs, so drive accordingly. The stock thermostat housing skews the radiator hose towards the driver side of the motor. We replaced it with an outlet that points forward, and found a pre-formed hose that fit great. The local auto parts store let us scavenge over their wall of radiator hoses, and we came up with upper and lower hoses, part numbers (D)71500, and (E)71200. I hope these are standard numbers, because I don’t have a clue what vehicles they are meant for.
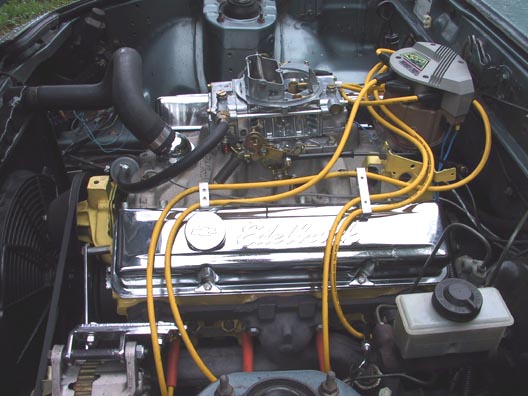
After the engine pulleys are in place, chances are that the alternator will no longer line up. We found a 3 piece kit made by Spectre that is called a header mount alternator bracket. Purchased locally, the brackets can also be found at Summit Racing . The Spectre part numbers are 4226, 4227 and 4228.(see Note1). By drilling two additional holes in the 4227 bracket and using a couple of spacers to mount the adjuster to the water pump, we were able to use the Mazda alternator, tucked nicely on the left side of the motor, where the air conditioning compressor used to be. Run a piece of string around the pulleys, measure the length, and add a couple of inches to find what size fanbelt you will need. Ours is 53 inches (# 53015).
We are using the tachometer and gauges in the RX-7 dashboard, instead of mounting external instrumentation. Granny’s Speed Shop website has detailed instructions for modifying and calibrating the stock RX-7 tachometer. In addition to installing the resistor on the printed circuit board, we extended the adjustment pot, using shielded audio cable, to a location that is accessible after the instrument cluster in reinstalled. Then, using an external tach, with the engine running, simply adjust the pot for the same reading. Ideally, the tach should be adjusted at about 3000 rpm for good linearity. The temperature sensor will require an adapter, to fit the intake manifold or head. A ½ inch pipe plug may be drilled and tapped, or the inexpensive adapter may be purchased at Granny’s Speed Shop. Although we will use the OEM sensors, we temporarily installed mechanical oil pressure and water temperature gauges for the initial starting and run-in of the motor.
The car isn’t totally finished yet, but is definitely streetable. Next thing to finish is the exhaust system. Presently, there is a Camaro header on the passenger side, and an iron exhaust manifold on the driver side, both running to two Cherry Bombs tucked on either side of the tranny,(we definitely don’t sneak up on anyone). The other header wouldn’t fit, and the junkyard only had one exhaust manifold that would fit (that was already removed from a vehicle). We want to go with the headers from Granny’s, although a matching exhaust manifold will probably go on first. The plan is for 2 inch pipes running to a dual-in, dual-out Flowmaster next to the gas tank.We also want to beef up the rear end suspension, as it torques pretty good on the shifts (chirps the tires even on mild acceleration), 15 inch wheels for a little better ground clearance, a cowl induction scoop for carb clearance, and lastly, new paint to make the package pretty.
I would be happy to answer any questions. Email Wayne or Geoff Maxwell at wayne@350rx7.com.
Note1 – Mr.Gasket offers identical parts as # 6680, 6679 and 4569.